First of all, I'd like to say it is hard to beat a deli made rotisserie chicken for convenience (and they taste pretty good), but with the price of raw chicken coming down (I found whole chickens at our local FM for 89 cents a pound which is a good price here in Alaska) it only makes sense to bake the chicken at home. There are no magic tricks for baking a chicken; stick to a couple of simple rules and you've got it made. Also, if you have a large roasting pan, you can bake a couple of these fat hens at the same time and you'll have enough chicken on hand (for sandwiches, salads, quick dinners, etc.) for the whole week.
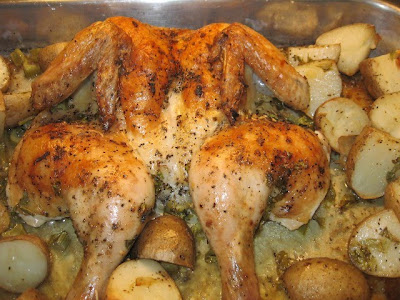
 I used to bake chickens whole (like you would a turkey), but was grossed out by the empty chicken cavity that filled with unappetizing-colored juices as it baked. To remedy that, I split the chicken open, removing the backbone and baked it flat. Now those mystery juices turn into a wonderful golden broth in the bottom of the pan and the whole dinner looks so much more appetizing.
First start off with whole chickens that are 3 to 4 pounds each. Remove them from their wrapper and sit the chickens, one at a time, in your kitchen sink. Steady the chickens in the upright position, with legs pointing down. Using a sharp knife, remove the backbone. Starting at the neck and slice down, along side of the backbone, all the way down to the tail section; repeat on the other side. Remove the backbone and discard (or see note). Removal of the backbone can also be done easily if you have a pair of very sharp kitchen scissors.
Once the backbone is removed, rinse the chicken thoroughly in running cold water, rubbing down all parts of the meat (see note); dry with paper towels. Because you will want this chicken to lay out flat in the roasting pan, crack (or cut) the breastbone but don't cut down into the meat. Once you crack the breastbone, you should be able to open the chicken and lay it down flat in a roasting pan like this:
Brush the chicken skin, lightly, with butter and sprinkle lightly (about ½ teaspoon) of onion powder then generously with salt and pepper. Surround with favorite veggies if you like.
Bake, uncovered, at 375F for 1½ hours (for 4 pound chicken). Remove from oven and cover loosely with foil and let it rest for 10 minutes. This produces a very tender and juicy chicken.

NOTE: It doesn't matter where you get your chicken from or what brand you buy; you still need to be very careful about cross-contamination when it comes to chicken.
ANYTHING that touches raw chicken (from your hands to utensils, to cutting boards,
to dish towels and sinks) needs to be washed thoroughly with warm soapy water before you touch anything else. I go a step farther and use a bleach based kitchen cleaner on all surfaces after preparing chicken.
NOTE: The backbone that you removed makes great chicken stock. Keep a resealable bag in the freezer and throw the backbones in there. When you get half dozen or so, you can make a fantastic chicken stock by throwing them in a pot of water (2 quarts) and adding onion, celery, carrots and peppercorns; simmer it all for a couple of hours then strain it. The crockpot is also excellent for making chicken stock.


0 comments:
Post a Comment